Showing posts with label crafty mom. Show all posts

Monday, January 27, 2014

Disney Frozen Theme Party: Our Behind the Scene Story

My daughter celebrated her 7th birthday last Saturday, January 25 and the party was a huge hit with guests! The food, the decor, the entertainment were all being raved about even after the party. Most importantly, the celebrant herself gleamed with happiness! :)
It was really overwhelming to receive positive comments and praises because this celebration was truly a labor of love. 

Just a background story. The original theme was Under the Sea, my daughter being such a fan of the adventurous Ariel the mermaid. So here's the inspiration board I created for the suppliers as early as November last year. The concept actually got across the suppliers already. 


Aren't they the daintiest? Can I just say how much I appreciate Google and Pinterest on occasion like this? It's got all the inspiration and guide you need to conceptualize a creative party.

Anyway, on with the story. Late November, my kids found out about Disney's Frozen. We were able to watch it a few weeks after it's opening night but even before that my daughter already memorized Let It Go, thanks to YouTube. When we finally got to watch it on big screen I remember her whispering, 'There it is Mommy, I get to see it without stopping (she meant buffering :)).

So, the Under The Sea theme was totally scrapped. After the movie, she wants a Disney Frozen theme with matching snow. Ayayay!

source
First on the to-do list was find inspiration for this party theme so I went back to Google and Pinterest for concepts on winter theme parties. You see, the idea is it has to be winter-y but not Christmas-y and the colors of Anna, Elsa's sister, has to be incorporated. 
Once I have the new inspiration board, I emailed and contacted all suppliers to tell them of changes. It was almost Christmas then and some suppliers are on holiday mode or already out on vacation but they responded promptly to my emails and texts. 
I'm so glad I stuck with suppliers who are easy to deal with because we have to go through colors of the table cloth and napkins, the flowers, cake and cupcakes design and all the itsy bitsy details al lover again. 
I'm a working mom and only have weekends and after work to take care of the preps so I need suppliers who immediately respond and follow through. 

source

More of our inspiration board. I wanted the stage to be a little different than what we usually see in birthdays and I'm so in love with all the decors at Kara's Party Ideas. Of course, eventhing has to sparkle. 
source
source
source
Disney's Frozen is new and already a big hit with kids and adults alike. Being fairly new, it was hard to find supplies locally that goes with the theme. After several days of checking online, I finally found one onlin shop that sells a few Frozen stuff. For the rest of decor, we decided to DIY so except for the balloons, everything was labor of love from family and friends from the candy buffet to the icicles on the stage. Her gown was, of course, made by her very talented lola Ninfa (my mom).

I'll share more of the pics of the actual party next time. Have a wonderful Monday everyone.

Tuesday, October 22, 2013

Sewing Project: Octopus Costume for Kids

School Halloween party for both our little kiddos (aka the kulitogs) will be 4 days from now. 

For the little girl, her costume is complete. Since she's gonna be a witch, I was able to buy her ensemble from the store, all for less than P400 including the broom and hat. I'm such a cheapo lol!

For the little boy, after searching online and mall hopping, no sign of octopus costume anywhere. After 2 weeks of looking I figured I have to make it from scratch so I redirected my Google search to 'How to Sew Octopus costume and found one at Martha Stewart's site. 

With a new inspiration in mind, I hopped to Fabric Warehouse and Carolina's in SM Megamall and bought black felt, silver fabric and all paraphernalias I need to finish the project. Both fabric is P350/yard and I bought 1 1/2 yrds of black and 1/2 yard of silver. Tip: buy extra fabric for the spots. Could be silver or other color. 

Over the weekend, I prepared to be mommy crafty and sewed the costume with my manual sewing machine. Yeah, I know, I need an upgrade to an electrical sewing machine. I almost gave up making this costume because the machine kept acting up. I had to stop and troubleshoot countless times.

 Can I just say this costume is a labor of love? So much labor to finish it and all for love of a little cutie boy who I can't wait see as a scary octopus (as he puts it) :)

For the tutorial, please hop on to the website. I'm not a very good at tutorials but I can tell you more about how to cut the fabric to help you in case you plan to do this as well. I made some tweaking on the the sewing procedure because I had to budget the fabric. I should've bought 3/4 yards of silver...

If you are new to sewing or want to make sure you got the right measurement, it's always best to measure and cut a pattern first. My mom, who is a dressmaker by profession, uses a pattern paper (the one bakeries use to pack pandesal with), a manila paper or even used newspaper if the fabric is not lightly colored (newsprint has the tendency to transfer to fabric). 

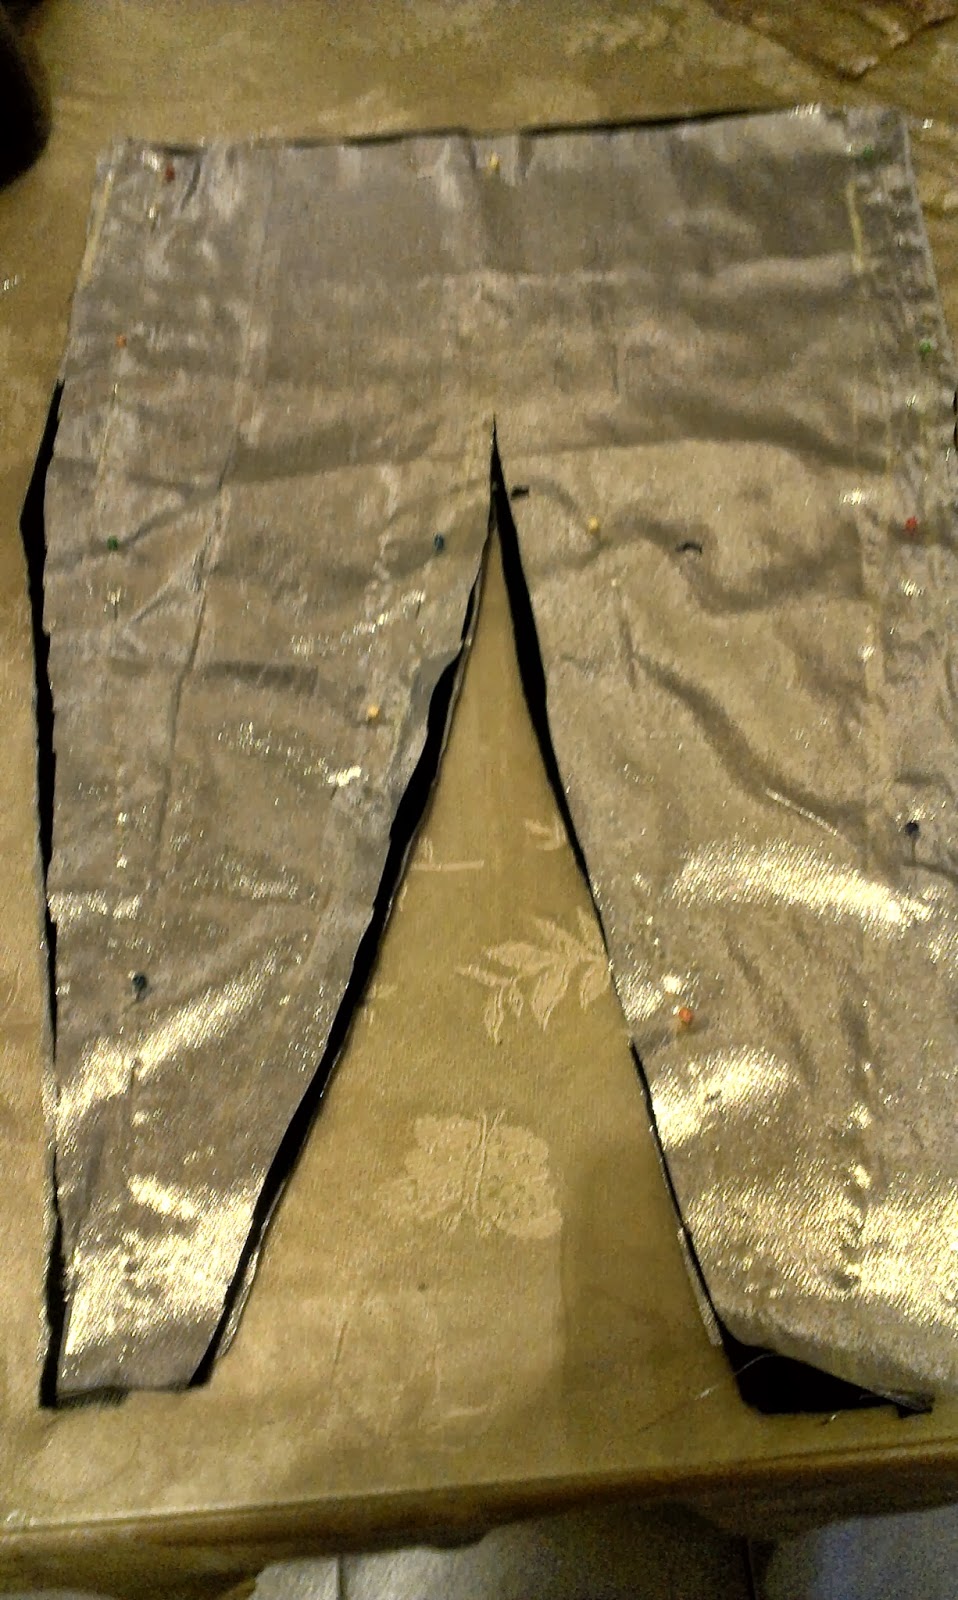
I made 3 sets of the cut below (the one that looks like pants). This will serve as tentacles and will make 6 of that. The 7th and 8th tentacles will be the boy's arms. The silver goes at the bottom while the black cloth as top of the costume. Sew the edges together but leave the top/wide part open for the stuffing. 


If you measure the top width of the six tentacles pattern, it should be: the width of the wearer's shoulder + allowance for moving around. Not too big or it will fall off his shoulders and not to small or it won't be comfy.


Do you see the faint yellow marks near the edges of the cut? Those are the marks of where the stitches should run. When cutting the fabric, make sure you have at least 1/2  to 1 inch allowance/leeway from the actual measurement or where the stitches will run.

The width of the tentacles was based on the little boy's arm width plus a few inches allowance for the stuffing. I wanted it to look fluffy and cute.


Now for the hood. I just followed the pattern in the tutorial and sewed on the curved lines. The horizontal and vertical straight lines were for the shoulder and face so don't sew them together.


Instead of stuffing the head with cotton, I did option B - I sewed the foam on the reverse side of the black fabric as I don't have enough fabric for a hood lining. I bought the stuffing used for quilts or comforters which is, if I remember it right, P60/yard.


Here is the sewn octopus tentacles. The silver spots are from leftover silver fabric; I used a glue gun to attach them to the black parts of the costume. 


The eyes of the octopus is a silver and black fabric glued together

 And here is our finish product (and my willing model). The little boy is playing pakipot but he's excited about his costume. 
Good thing the hood formed it's shape even with option B. 
It's still a work in progress. I want to put the eyes more in front than the sides so it's more visible and I want to add something purple, perhaps more spots. Instead of sewing strings in front, I just sewed the two ends together for convenience and less worry of getting untied during trick or treating.


 And speaking of trick or treat, can you tell how ready we are with these goodies? These candies we collected as early as last month. S & R came to visit my work for weeks and I grabbed all their buy-1- take-1 candies hehe! Or should I say hi-hi-hi-hi-hi (in a very high pitch) :)


Related Posts with Thumbnails